【※ 当記事は2020年7月2日時点の情報です】
ペイヴメント(@pavement1234)です。
ゆくゆくはReact Nativeでスマホアプリを作りたい。
React.jsってご存じですか?
Facebookを中心に開発されている
ユーザインタフェース構築のためのJavaScriptライブラリです。
Facebook、InstagramはReactで作られています。
さらにReactを拡張したReacgt Nativeというライブラリを使えば
JavaScriptでネイティブアプリも作れます。
Reactの特徴
・値の更新を自動的にGUIに反映するリアクティブというメカニズムを備えている
・仮想DOMという仕組みで高速にHTMLの表示を更新できる
続いて、Reactを使うメリットとデメリット。
メリット:DOMから状態(state)を分離できる
部品毎にコンポーネントを作れるので再利用性が高い。
応用編のReact Nativeを覚えればスマホアプリが作れる。
エンジニアが不足してるらしいので需要が多いかもしれない
デメリット:情報が少なくて難しい
本格的な処理を作ろうとすると追加で必要な機能が多い
(Node.js、babel、webpack、Redux、Next.jsなど)Ajaxが苦手
今回はシンプルなReactをご紹介します。
準備
Node.jsのインストール
JavaScriptのパッケージ管理ツール(npm)をインストールするために
Node.jsをインストールしておいてください。
Node.jsのインストール方法はコチラ。
【初心者向け】Node.jsのインストールと簡易Webサーバの実験
HTMLだけでReactを試す
①HTMLを書く
test.htmlというファイルを作成し、
以下の内容を書きます。
|
1 2 3 4 5 6 7 8 9 10 11 12 13 14 15 16 17 18 19 20 21 22 23 24 25 26 27 28 29 30 31 32 |
<!DOCTYPE html> <html lang="ja"> <head> <meta charset="utf-8"> <title>React CDN TEST</title> <!-- React CDN --> <script src="https://unpkg.com/react@16/umd/react.development.js"></script> <script src="https://unpkg.com/react-dom@16/umd/react-dom.development.js"></script> <style> #test { cursor: pointer; font-size: 30pt; background-color:lightgray; } </style> </head> <body> <div id="test" onclick="cntUp();">---</div> <script> let cnt = 0; let dom = document.querySelector('#test'); function cntUp(){ cnt++; let elem = React.createElement('p', {}, "cnt: " + cnt ); ReactDOM.render( elem, dom ); } </script> </body> </html> |
②解説
7~9行目:reactとreact-domのCDN(Contents Delively Network)を読み込みます。
※CDNと呼ばれるサーバ上のコンテンツ(今回はJavaScript)を読み込むことで、
インストールせずにreactを使えます。
|
1 2 3 |
<!-- React CDN --> <script src="https://unpkg.com/react@16/umd/react.development.js"></script> <script src="https://unpkg.com/react-dom@16/umd/react-dom.development.js"></script> |
11~17行:”test”というidを持つ要素に対して独自CSSを書きます
今回ボタンの役目を持たせるためカーソルをポインタにしています。
|
1 2 3 4 5 6 7 |
<style> #test { cursor: pointer; font-size: 30pt; background-color:lightgray; } </style> |
20行目:divタグを作成し”test”というidを持つ要素を設定し、
onclickイベントでcntUpという関数が呼ばれるようにします。
—は初期状態で表示される文字列です。
|
1 |
<div id="test" onclick="cntUp();">---</div> |
21~30行目:今回の肝となるJavaScript
cntとdomという変数を定義。
domに”#test”要素を紐づける。
cntUp関数はまずcntをインクリメント(加算)し、
「cnt: カウント数」という文字列を表示するためのpタグ(elem)を作成。
ReactDOMのrenderメソッドにdomとpタグ(elem)を渡し、
レンダリングする。
|
1 2 3 4 5 6 7 8 9 10 |
<script> let cnt = 0; let dom = document.querySelector('#test'); function cntUp(){ cnt++; let elem = React.createElement('p', {}, "cnt: " + cnt ); ReactDOM.render( elem, dom ); } </script> |
③実行結果
初期状態はこんな感じです
灰色のエリアを1回クリックするとカウントが1になります
灰色のエリアを99回クリックしました
(リセット機構はないので、飽きたらページを閉じてください)
以上、1つのHTMLファイルだけでReactを試してみました。
Create React Appを試してみる
Create React Appというのは、
Reactの学習用サンプルです。
①コマンドプロンプトを立ち上げる
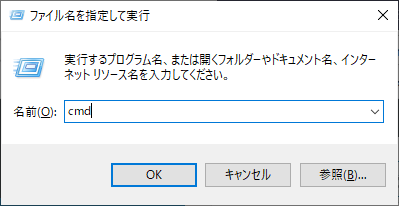
「Win+R」を押して「ファイル名を指定して実行」ダイアログを出し、
cmdと打ち込み「OK」を押します。
②Create React Appをインストールする
コマンドプロンプトに水色のコマンド(4行)を順に打ち込むと
インストールしてCreate React Appを表示できます。
途中で「Happy Hacking」というメッセージが出ればインストールが成功しています。
ちなみに今回は「C:\temp\react」にインストールしました。
なお、水色のコマンドを最後まで打ち込むと
WEBサーバが起動してCreate React Appのページが表示されますが、
Ctrl+CでWEBサーバを終わらせることが可能です。
C:\temp\react>npm install -g create-react-app
C:\Users\pavement1234\AppData\Roaming\npm\create-react-app -> C:\Users\pavement1234\AppData\Roaming\npm\node_modules\create-react-app\index.js
+ create-react-app@3.4.1
added 98 packages from 46 contributors in 12.319s
C:\temp\react>create-react-app test
Creating a new React app in C:\temp\react\test.
Installing packages. This might take a couple of minutes.
Installing react, react-dom, and react-scripts with cra-template…
> core-js@2.6.11 postinstall C:\temp\react\test\node_modules\babel-runtime\node_modules\core-js
> node -e “try{require(‘./postinstall’)}catch(e){}”
> core-js@3.6.5 postinstall C:\temp\react\test\node_modules\core-js
> node -e “try{require(‘./postinstall’)}catch(e){}”
> core-js-pure@3.6.5 postinstall C:\temp\react\test\node_modules\core-js-pure
> node -e “try{require(‘./postinstall’)}catch(e){}”
+ cra-template@1.0.3
+ react-scripts@3.4.1
+ react@16.13.1
+ react-dom@16.13.1
added 1626 packages from 750 contributors and audited 1630 packages in 138.919s
59 packages are looking for funding
run npm fund for details
found 1 low severity vulnerability
run npm audit fix to fix them, or npm audit for details
Git repo not initialized Error: Command failed: git –version
at checkExecSyncError (child_process.js:630:11)
at execSync (child_process.js:666:15)
at tryGitInit (C:\temp\react\test\node_modules\react-scripts\scripts\init.js:46:5)
at module.exports (C:\temp\react\test\node_modules\react-scripts\scripts\init.js:266:7)
at [eval]:3:14
at Script.runInThisContext (vm.js:120:20)
at Object.runInThisContext (vm.js:311:38)
at Object.<anonymous> ([eval]-wrapper:10:26)
at Module._compile (internal/modules/cjs/loader.js:1138:30)
at evalScript (internal/process/execution.js:94:25) {
status: 1,
signal: null,
output: [ null, null, null ],
pid: 23872,
stdout: null,
stderr: null
}
Installing template dependencies using npm…
npm WARN tsutils@3.17.1 requires a peer of typescript@>=2.8.0 || >= 3.2.0-dev || >= 3.3.0-dev || >= 3.4.0-dev || >= 3.5.0-dev || >= 3.6.0-dev || >= 3.6.0-beta || >= 3.7.0-dev || >= 3.7.0-beta but none is installed. You must install peer dependencies yourself.
npm WARN optional SKIPPING OPTIONAL DEPENDENCY: fsevents@2.1.2 (node_modules\fsevents):
npm WARN notsup SKIPPING OPTIONAL DEPENDENCY: Unsupported platform for fsevents@2.1.2: wanted {“os”:”darwin”,”arch”:”any”} (current: {“os”:”win32″,”arch”:”x64″})
npm WARN optional SKIPPING OPTIONAL DEPENDENCY: fsevents@1.2.13 (node_modules\jest-haste-map\node_modules\fsevents):
npm WARN notsup SKIPPING OPTIONAL DEPENDENCY: Unsupported platform for fsevents@1.2.13: wanted {“os”:”darwin”,”arch”:”any”} (current: {“os”:”win32″,”arch”:”x64″})
npm WARN optional SKIPPING OPTIONAL DEPENDENCY: fsevents@1.2.13 (node_modules\watchpack-chokidar2\node_modules\fsevents):
npm WARN notsup SKIPPING OPTIONAL DEPENDENCY: Unsupported platform for fsevents@1.2.13: wanted {“os”:”darwin”,”arch”:”any”} (current: {“os”:”win32″,”arch”:”x64″})
npm WARN optional SKIPPING OPTIONAL DEPENDENCY: fsevents@1.2.13 (node_modules\webpack-dev-server\node_modules\fsevents):
npm WARN notsup SKIPPING OPTIONAL DEPENDENCY: Unsupported platform for fsevents@1.2.13: wanted {“os”:”darwin”,”arch”:”any”} (current: {“os”:”win32″,”arch”:”x64″})
+ @testing-library/jest-dom@4.2.4
+ @testing-library/react@9.5.0
+ @testing-library/user-event@7.2.1
added 36 packages from 56 contributors and audited 1666 packages in 13.526s
59 packages are looking for funding
run npm fund for details
found 1 low severity vulnerability
run npm audit fix to fix them, or npm audit for details
Removing template package using npm…
npm WARN tsutils@3.17.1 requires a peer of typescript@>=2.8.0 || >= 3.2.0-dev || >= 3.3.0-dev || >= 3.4.0-dev || >= 3.5.0-dev || >= 3.6.0-dev || >= 3.6.0-beta || >= 3.7.0-dev || >= 3.7.0-beta but none is installed. You must install peer dependencies yourself.
npm WARN optional SKIPPING OPTIONAL DEPENDENCY: fsevents@2.1.2 (node_modules\fsevents):
npm WARN notsup SKIPPING OPTIONAL DEPENDENCY: Unsupported platform for fsevents@2.1.2: wanted {“os”:”darwin”,”arch”:”any”} (current: {“os”:”win32″,”arch”:”x64″})
npm WARN optional SKIPPING OPTIONAL DEPENDENCY: fsevents@1.2.13 (node_modules\jest-haste-map\node_modules\fsevents):
npm WARN notsup SKIPPING OPTIONAL DEPENDENCY: Unsupported platform for fsevents@1.2.13: wanted {“os”:”darwin”,”arch”:”any”} (current: {“os”:”win32″,”arch”:”x64″})
npm WARN optional SKIPPING OPTIONAL DEPENDENCY: fsevents@1.2.13 (node_modules\watchpack-chokidar2\node_modules\fsevents):
npm WARN notsup SKIPPING OPTIONAL DEPENDENCY: Unsupported platform for fsevents@1.2.13: wanted {“os”:”darwin”,”arch”:”any”} (current: {“os”:”win32″,”arch”:”x64″})
npm WARN optional SKIPPING OPTIONAL DEPENDENCY: fsevents@1.2.13 (node_modules\webpack-dev-server\node_modules\fsevents):
npm WARN notsup SKIPPING OPTIONAL DEPENDENCY: Unsupported platform for fsevents@1.2.13: wanted {“os”:”darwin”,”arch”:”any”} (current: {“os”:”win32″,”arch”:”x64″})
removed 1 package and audited 1665 packages in 7.435s
59 packages are looking for funding
run npm fund for details
found 1 low severity vulnerability
run npm audit fix to fix them, or npm audit for details
Success! Created test at C:\temp\react\test
Inside that directory, you can run several commands:
npm start
Starts the development server.
npm run build
Bundles the app into static files for production.
npm test
Starts the test runner.
npm run eject
Removes this tool and copies build dependencies, configuration files
and scripts into the app directory. If you do this, you can’t go back!
We suggest that you begin by typing:
cd test
npm start
Happy hacking!
C:\temp\react>cd test
C:\temp\react\test>npm start
> test@0.1.0 start C:\temp\react\test
> react-scripts start
i 「wds」: Project is running at http://192.168.56.1/
i 「wds」: webpack output is served from
i 「wds」: Content not from webpack is served from C:\temp\react\test\public
i 「wds」: 404s will fallback to /
Starting the development server…
Compiled successfully!
You can now view test in the browser.
Local: http://localhost:3000
On Your Network: http://192.168.xx.1:3000
Note that the development build is not optimized.
To create a production build, use npm run build.
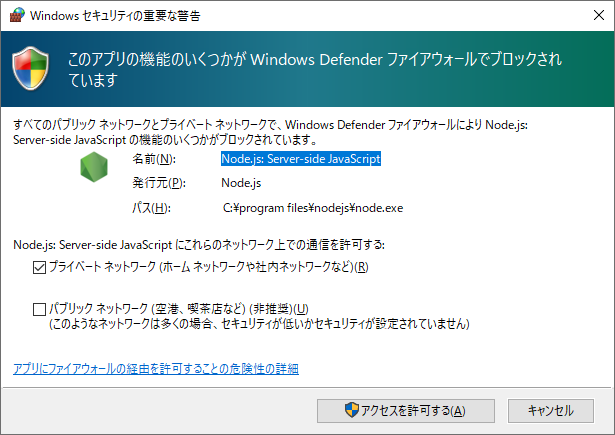
③ファイアウォールの警告が出るので「アクセスを許可する」をクリック
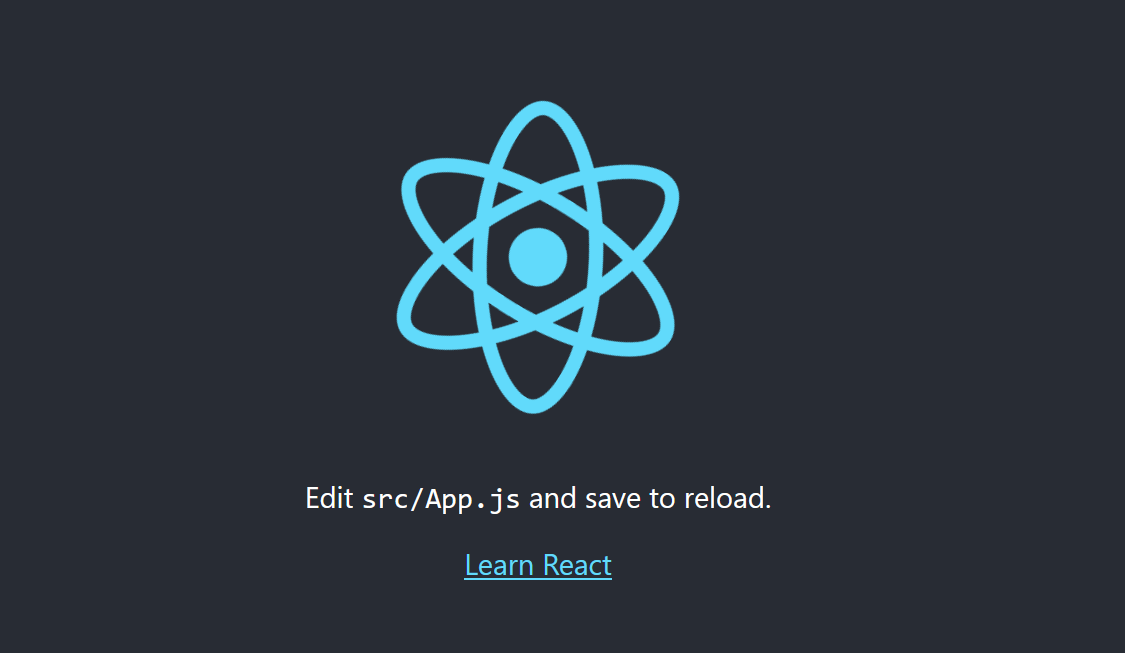
④Create React Appがブラウザで表示されます
⑤ソースを見てみる
「C:\temp\react\test\src\App.js」を開きます。
※上記の通りインストールした場合はこの場所にあります。
トップページはこんな感じみたいです。
Appという関数の戻り値としてHTMLが表示されるんですね。
|
1 2 3 4 5 6 7 8 9 10 11 12 13 14 15 16 17 18 19 20 21 22 23 24 25 26 |
import React from 'react'; import logo from './logo.svg'; import './App.css'; function App() { return ( <div className="App"> <header className="App-header"> <img src={logo} className="App-logo" alt="logo" /> <p> Edit <code>src/App.js</code> and save to reload. </p> <a className="App-link" href="https://reactjs.org" target="_blank" rel="noopener noreferrer" > Learn React </a> </header> </div> ); } export default App; |
まとめ
Reactの初歩の初歩をご紹介しました。
Reactらしいことはやっておらず、今がスタート地点です。
次回はBabel、JSX、Redux、Next.jsなどを使った応用編をご紹介します。
関連記事(JavaScript)
【初心者向け】JavaScript無料学習(前編)
【初心者向け】JavaScript無料学習(後編)
【初心者向け】React.jsの基本を知りたい
【初心者向け】Node.jsのインストールと簡易Webサーバの実験


-640x360.png)


